Most tumbling block quilts are associated with pastel fabrics and gifts for baby showers. The tumbling block pattern is quite simple, yet with complicated components. When making a tumbling block quilt, you can lend a bit of sophistication or charm just by changing the fabric choices. The key to making the quilt is careful planning and placement. A design board is recommended, since the project can take a while to finish, and re-laying out the pieces can become frustrating if done more than a few times.
Decide on the size of your quilt. Large diamonds will make a quilt faster than smaller diamonds, but they will give you a different look. Large diamonds with only three fabrics can be used to force the tumbling block pattern, while small blocks, done in a variety of fabrics, can give a crafty, home-warmed feeling.
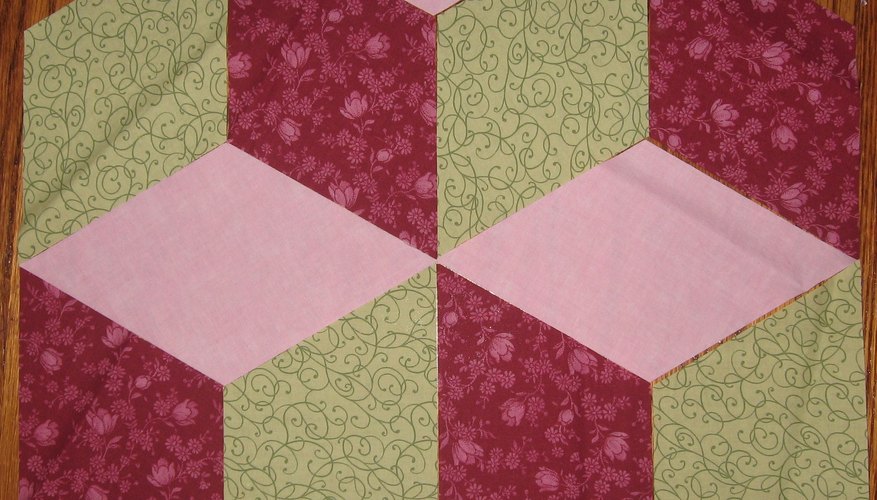
- Most tumbling block quilts are associated with pastel fabrics and gifts for baby showers.
- Large diamonds with only three fabrics can be used to force the tumbling block pattern, while small blocks, done in a variety of fabrics, can give a crafty, home-warmed feeling.
Cut out equal amounts of fabric from the three shades using a 60-degree angle diamond template or an acrylic rotary ruler with a rotary cutter. If hand piecing, you may want to only trace the diamond shape and cut a quarter of an inch away. The drawn line becomes your seam line.
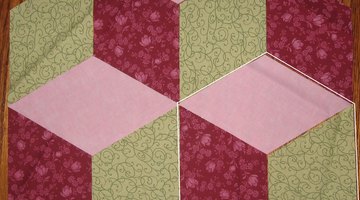
Lay your fabric diamonds on an undisturbed table or design board in the desired pattern. Stay consistent with the pattern to keep the visual effect of the blocks repeating.
Choose which of two piecing methods you want to use. The first involves sewing together all the "blocks" themselves and then connecting them individually to complete the quilt. Fold your pieces right sides together just before you are about to sew. If the wrong edges are sewn together the "block" pattern may fail and you will need to remove the stitches and start again.
- Cut out equal amounts of fabric from the three shades using a 60-degree angle diamond template or an acrylic rotary ruler with a rotary cutter.
- If the wrong edges are sewn together the "block" pattern may fail and you will need to remove the stitches and start again.

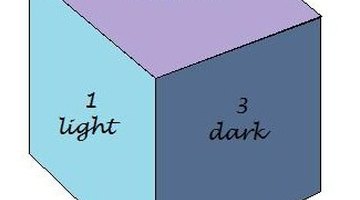
Create your quilt top in a different way if you want to use the "star" method. This involves pairing up six diamonds at a time with the light, medium and dark fabrics always rotating in the same order. In this method the fabric shades also line up opposite themselves; the medium fabric will be across from the other medium fabric in a repeating pattern.
Piece your "blocks" or "stars" by starting your sewing line a quarter of an inch from the end and finish one quarter of an inch away from the other end. It may help to mark a quarter inch dot on the wrong side of all four edges of each diamond before sewing. Sewing at these points will allow the seams to press and lay flat.
Sew the "block" units until you have enough to piece the entire top together. For the "stars," additional diamonds will be needed to space the stars out. Pay attention to the placement and colour of the additional diamonds between the stars as the quilt top is pieced. Add additional diamonds to the edges if desired or cut along the outermost blocks to create a straight edge for the quilt.
- Create your quilt top in a different way if you want to use the "star" method.
- Add additional diamonds to the edges if desired or cut along the outermost blocks to create a straight edge for the quilt.
Lay the backing fabric right side down followed by the batting. Place the quilt top wrong side down over the batting and backing. Pin the layers together. Quilt in a desired pattern and complete the quilt by attaching the binding.
TIP
For a nostalgic farm quilt look, try using scrap pieces of fabric without following the light, medium and dark pattern for the blocks. Simply sew the quilt, choosing fabric at random. The pattern will show through, even though the fabrics don't force the tumbling block illusion.
WARNING
Double check your piecing alignment before sewing. Pin the pieces and fold open to be sure that the alignment is correct.