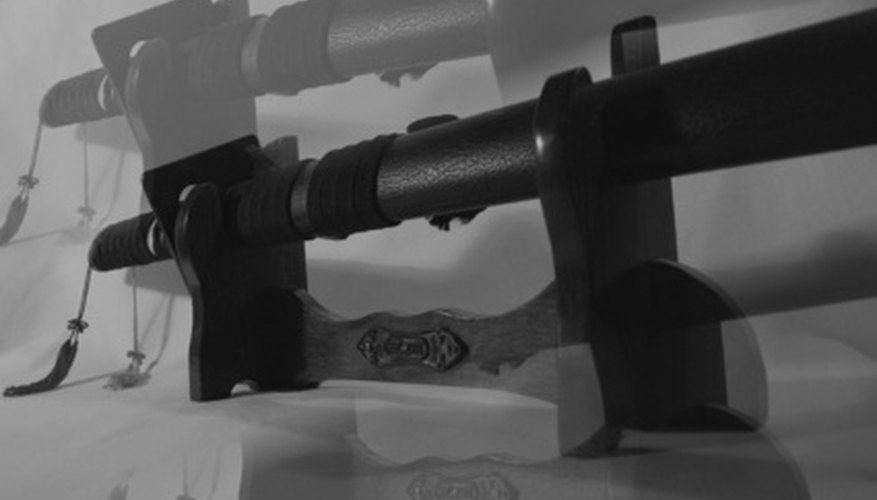
A hand-forged, high-quality Katana is a visually stunning work of craftsmanship, and displaying the blade artfully has been as much a part of the Samurai culture and history as its role on the battlefield. The Katanakake, or sword stand, can be designed to accommodate multiple companion swords or a single Katana and is often made of high-quality materials and finish to complement the quality of the blades.
- A hand-forged, high-quality Katana is a visually stunning work of craftsmanship, and displaying the blade artfully has been as much a part of the Samurai culture and history as its role on the battlefield.
- The Katanakake, or sword stand, can be designed to accommodate multiple companion swords or a single Katana and is often made of high-quality materials and finish to complement the quality of the blades.
Look at images of traditional Katana stands to get design ideas and draw up some sketches of styles you like.
Measure your Katana in its sheath from the hand guard to the tip of the sheath. Then measure the length of the handle. Use these measurements to determine how far apart the supports must be in order for the Katana to be centred (e.g., a 41-inch Katana with an 11-inch handle will need the supports separated by about 19 inches).
Draw on a large piece of paper, or several sheets of paper taped together, the full-sized outline of the Katana stand's supports. Many styles are ornamental flame-like shapes with multiple indentations for swords, but at the very least a stand support must have a wide, flat bottom to form the base of the stand and a round indentation or notch at the top, large enough for your sword. Cut out the full-sized template with your scissors and set it aside.
On another large sheet of paper, draw a line to the length you determined the spacer would have to be, based on the length of your sword. Use this line to draw a rectangle with sides about 3 to 5 inches deep. Most Katana stands have slightly curved spacers to complement the arc of the sword, so without changing the sides of the rectangle, you can modify the tops and bottoms with equally sized upward curves. Once you have a shape that you desire, cut out the template with your scissors and set it aside.
Lay your side support template down on top of your 1-by-8-foot hardwood board and carefully trace around it directly onto the wood.
- On another large sheet of paper, draw a line to the length you determined the spacer would have to be, based on the length of your sword.
- Lay your side support template down on top of your 1-by-8-foot hardwood board and carefully trace around it directly onto the wood.
Clamp your board down to a work bench or table and cut out the traced pattern with your electric jigsaw. Try to cut consistently so that both sides of the stand will be the same size. Sand any rough edges.
Place your side support template on top of your board and trace the outline of it carefully. Make sure if you are using an asymmetrical design that the template is facing the same direction as it was for the piece that you just cut.
Clamp down your hardwood board and cut out the pattern with your electric jigsaw. Lay the new side support over the old one and line up the edges as much as possible. You may need to sand down both pieces to get them as identical as possible.
- Place your side support template on top of your board and trace the outline of it carefully.
- Lay the new side support over the old one and line up the edges as much as possible.
To attain a more professional look, use a router with a roundover bit to create a bevelled edge on the support pieces. Do not bevel the bottom of the stand, however; you will want this to remain flat to create a sturdy base.
Lay your spacer template on top of your remaining hardwood board and trace the outline with a pencil. Cut out the pattern with your electric jigsaw and sand any rough edges.
Measure along the bottom of one of your side support pieces and mark the centre point. Draw a vertical line down the centre, bisecting the support piece and mark a point several inches up from the bottom along this line. Mark a second point about 1 inch above the first point. Repeat this procedure on the other vertical support piece, being sure to measure carefully so that you make your marks in exactly the same places.
- Lay your spacer template on top of your remaining hardwood board and trace the outline with a pencil.
- Draw a vertical line down the centre, bisecting the support piece and mark a point several inches up from the bottom along this line.
Drill a 1/4-inch hole through both points on each side support.
Dry fit your spacer piece in between the two support pieces so that the edges of the spacer are flush against the holes, level and at a height you desire. Stick your pencil tip through the holes in the side pieces, and make a mark on the edges of the spacer piece.
Carefully drill a 1/4-inch hole, about 3/4 of an inch deep, into the four connection points on the edges of the spacer piece.
Cut four pieces of 1/4-inch dowel rod, 1.5 inches long, to act as joining pegs.
Assemble the pieces of your Katana stand so that the holes in the space piece and the side supports are lined up. Dry fit your joining pegs into the holes and place your Katana on top of the stand to make sure it fits. Remove the pegs, apply a small amount of wood glue to the inside of the holes, and insert your joining pegs through the support pieces and into the spacer. If necessary, tap the sides with a rubber mallet to achieve a tight fit. Allow the pieces to dry for at least 24 hours.
- Dry fit your spacer piece in between the two support pieces so that the edges of the spacer are flush against the holes, level and at a height you desire.
- Remove the pegs, apply a small amount of wood glue to the inside of the holes, and insert your joining pegs through the support pieces and into the spacer.
Once your stand is finished drying, inspect the connection points and sand off any excess dowel rod until the joining pegs are flush with the sides of the stand. Sand the entire stand until the wood is smooth and uniform.
Apply a coat of wood stain or paint that complements the finish on your sword and allow it to dry for the recommended amount of time.
Sand and repeat staining/painting as necessary to achieve the desired shade. When the finish is fully dry, seal the entire stand with several coats of glossy polyurethane and allow the coats to dry before placing your sword in the stand.
TIP
When building a stand for multiple swords of different lengths, measure the length of each sword and use a spacer length that will accommodate the smallest sword in the set. You can then stagger the other longer swords so that they are all balanced in the middle of the stand.