
The proper name for lead soldiers is "metal" toy soldiers since lead has been banned for making toy soldiers for children since 1966. Most hobbyists today use a nontoxic tin-based, low-melting-point metal alloy for making their "tin" soldiers. Metal soldiers are more expensive and more fragile than cheaper plastic ones, but there is nothing quite as much fun as making your very own "Army Men" and deploying them in ranked battalions on your dining room table.
Making the mould
Obtain or carve an original soldier from which you will create the mould. You can use toy soldiers you can purchase online or in local hobby shops or make original figures from clay or carve them from wood. Draw a "parting" line on the original with a marker to show where the mould will separate.
Make a box larger than your original and fill it halfway with a layer of Klean Clay moulding compound or similar product.
Clean your figure with alcohol and dry it. Press the figure into the clay to the parting line. If the clay is too stiff, soften it in the microwave.
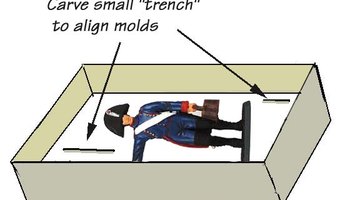
Dig lines around the edge of the clay to help you line up the moulds.
Mix and pour silicone rubber mould material over the original and clay and fill to the top of the box. Cure 24 hours.
Remove the rubber mould and the original from the box without breaking the seal between them. Carefully remove the clay from the box and clean the box.
- Obtain or carve an original soldier from which you will create the mould.
- If the clay is too stiff, soften it in the microwave.
- Remove the rubber mould and the original from the box without breaking the seal between them.
Coat the rubber mould fully with a thick coat of mould release so the second silicone mould will not adhere to the first. Don't coat the original with mould release. Place the original mould in the box with the original up.
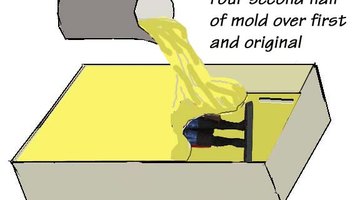
Mix and pour silicone rubber mould material over the first mould and original. Fill the box and allow to cure for 24 hours.
Separate the two halves of the mould and carefully remove the original.
Cut a pour hole with a sharp craft knife. Make a narrow trench cut into the rubber from the outside to the mould space in an inconspicuous location on the figure. Create very small vent holes to allow air to escape during the moulding process, if the mould has problems with creating air pockets during formation.
Casting the model
Press the two halves of the mould together, insert in the moulding box and secure with rubber bands. Cut away a hole over the pour hole.
Place a small piece of casting metal in the casting ladle. Heat the metal as indicated. Lead melts at 260 degrees C (500 degrees F) and requires a propane torch. Tin/lead/cadmium/bismuth alloy works well with rubber moulds, melting at 71.1 degrees C (160 degrees F) -- attainable with a candle flame. Tin/bismuth alloy is lead and cadmium free, but requires a small butane torch to reach melting at 137 degrees C (280 degrees F). Lead-free crown pewter is 92 per cent tin and melts at 301 degrees C (575 degrees F) requiring a propane torch.
- Press the two halves of the mould together, insert in the moulding box and secure with rubber bands.
- Tin/lead/cadmium/bismuth alloy works well with rubber moulds, melting at 71.1 degrees C (160 degrees F) -- attainable with a candle flame.
Pour the melted metal into the pour hole till it reaches the fill opening. Pour slowly to prevent the formation of air bubbles inside the mould.
Remove the mould from the box and separate the mould halves once the metal has cooled. Gently remove the figure.
Trim any flashing or bits of metal from the pour holes and smooth the cuts with sandpaper. Paint the figures with an oil-based paint.
TIP
Be sure you melt enough metal to complete the figure in a single pour to avoid seams and bubbles. Vent the mould only if the mould tends to form bubbles so you don't have extra protrusions from vent holds. Allow plenty of curing time for the moulds if they are to stand up to the heat of casting.
WARNING
Do not let children younger than 14 handle lead products. Wear eye protection while heating and pouring hot metal. Wear gloves while handling chemicals and molten metal.