Sharpened wood posts are useful when installing fencing or support posts in rough areas where you cannot use a post hole digger. The posts can be driven into the ground using a maul or post driving mallet. Sharpening wood posts can be done in several ways; the most efficient depends on the type of post that is being sharpened and the kind of wood.
Brace the stake or post securely at an angle, pointing away from you, with the bottom end resting on the ground. Secure the post between two trees growing close together, use one end of a sawhorse or make a tripod of poles to hold the upper end of the post.
Clear the ground around the base of the post. Remove rocks or other objects that could damage the hatchet. Use a mound of sawdust or a flat board to rest the bottom end of the post or stake on.
- Sharpened wood posts are useful when installing fencing or support posts in rough areas where you cannot use a post hole digger.
- Use a mound of sawdust or a flat board to rest the bottom end of the post or stake on.
Stand or squat slightly behind and to the side of the post or stake, putting it on the side of your body that is opposite the hand you chop with. Grasp the post or stake above the area to be sharpened, using your other hand. Positioned your feet behind the part of the post or stake you are sharpening.
- Stand or squat slightly behind and to the side of the post or stake, putting it on the side of your body that is opposite the hand you chop with.
- Positioned your feet behind the part of the post or stake you are sharpening.
Use your dominant hand to hold the hatchet at the midsection of the handle. With the post or stake firmly braced, angle the hatchet so that it will whittle off a thin splinter of wood from the stake or post. Chop firmly downward and away from your body.
Continue the whittling motion, turning the post at intervals, until it develops a point. The post or stake is ready to drive into the ground.
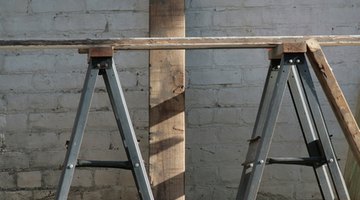
Position the piece of lumber that is going to be the post on top of a table or a saw horse. Let the end that is going to be sharpened extend eight to 10 inches off the table or saw horse.
- Position the piece of lumber that is going to be the post on top of a table or a saw horse.
- Let the end that is going to be sharpened extend eight to 10 inches off the table or saw horse.
Use a carpenter's square to mark the centre point at the base of the post; draw the outside edges of the point. This will produce a chisel-shaped point.
Position the saw at the top of the marked edge. Push the saw away from your body as you cut if you are using power tools. Position yourself toward the end of the cut to be able to correctly operate the saw if you are using a handsaw.
Turn the milled lumber so that the cut edges are top and bottom, if desired. Repeat the process of marking and cutting the other two edges. This will turn the chisel point into a pyramid-style point.
TIP
Select good hardwoods for fence posts. They will last longer and reward your labour better than soft woods. Oak and cedar make good fence posts.
WARNING
Always use good safety practices when using any kind of cutting tool. If you use an axe instead of a hatchet, choke up on the handle for good control until you get the hang of using it. If at all possible, always cut away from your body.