The window sill supports the jambs which support the headers which support -- well, the entire wall eventually. They are also the most exposed portion of the structure of the window, lying open to sun, rain and wind. As a result, the sill -- or its outside end called the "nose" -- often rots or cracks before any other part of the window frame begins to deteriorate.
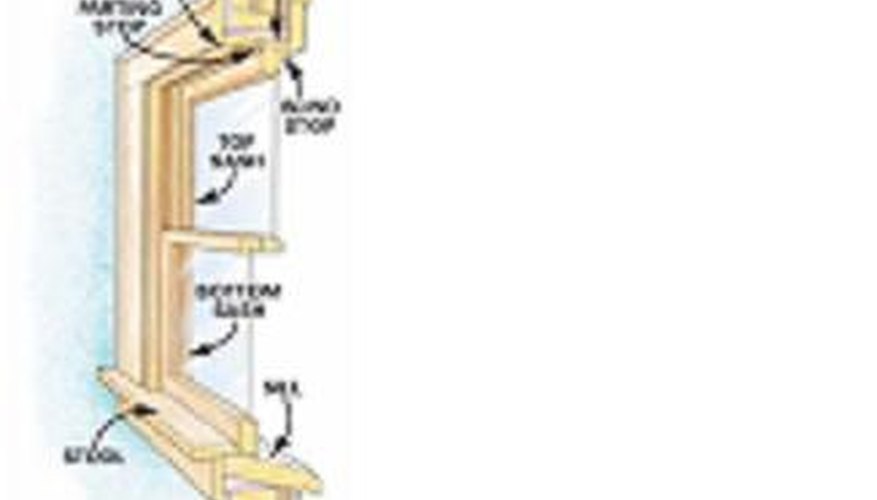
Examine your sill closely. Most sills are wedged between the side window jambs and tilt at about a 14-degree angle for good drainage. They are trimmed inside the window with a cap called a "stool" which sits on a base, called an "apron." To remove the sill, you'll need to remove these two pieces of inside trim and any exterior trim that covers the ends of the sill. Remove caulking between the window frame and sill then clean out any caulking in the corners between the jambs and the sill.
- The window sill supports the jambs which support the headers which support -- well, the entire wall eventually.
- Most sills are wedged between the side window jambs and tilt at about a 14-degree angle for good drainage.
Cut through the sill from interior to exterior in a few places, depending on the width of the window and how tightly the sill is installed. Pry as much of the sill out as possible, then clean out the rest with a hammer and chisel, being careful not to damage the jambs. Most sills sit in dados cut into the base of the jambs -- these will be the anchoring positions for your new sill. Pull or cut any nails out of the dados and remove nails or caulking under the sill clean to the bottom jamb or brickwork. Cut a 5 by 15 or 20 cm (2 by 6 or 8 inch) piece of wood to fit the opening.
Fashion several supports for your new sill out of 5 by 10 cm (2 inch by 4 inch) blocks with slanted tops so the sill will sit on them with a 14-degree outward downward slant. Trim the ends of the sill with a router or chisel so they fit the dados on the jambs. Dry-fit the sill into the space and make any adjustments necessary to the blocks so the sill slides into the dados and sits level from side to side so water doesn't drain toward a jamb. Fasten blocks to jambs with non-corrosive screws and set other blocks into the bottom jamb with construction adhesive, being careful to maintain the same angle as the old sill. Attach the sill to the blocks with plenty of construction adhesive or caulk. Caulk the ends of the sill along the dados, allowing enough clearance for the window sash.
- Cut through the sill from interior to exterior in a few places, depending on the width of the window and how tightly the sill is installed.
- Dry-fit the sill into the space and make any adjustments necessary to the blocks so the sill slides into the dados and sits level from side to side so water doesn't drain toward a jamb.
Use a sill nose as an extension for a very deep sill or just the end of the sill that needs to be replaced. Remove the last few inches of the sill for a partial replacement. Use a router or small circular saw to make cuts on the sill to match the nose and trim the nose on the ends to fit into the jambs. After dry-fitting everything, apply liberal beads of adhesive or caulk along the undersides and dado of the sill nose and slide it into place, matching the bottom dado to the outer edge of the jamb.
- Use a sill nose as an extension for a very deep sill or just the end of the sill that needs to be replaced.
- After dry-fitting everything, apply liberal beads of adhesive or caulk along the undersides and dado of the sill nose and slide it into place, matching the bottom dado to the outer edge of the jamb.
Caulk carefully when the adhesive is dry. Sand lightly, rounding the outer corners, then prime and paint with an oil-base exterior paint. When dry, reinstall the stool and apron interior trim and exterior trim if any has been removed in the process.
TIP
If you use preserved timber, lay it flat outside to allow the preservatives to "vent" any vapours before using it or painting. Use coated or non-corrosive hardware to withstand rain, dampness and building materials' chemistry.
WARNING
Always use eye protection when using hand or power tools.